
Simplifying an Image

I was in Chicago over the weekend and just returned home. The image below as taken while on the Ferris wheel at Navy Pier. I normally bracket my shots and this one was bracketed then combined in Lightroom (image #1).


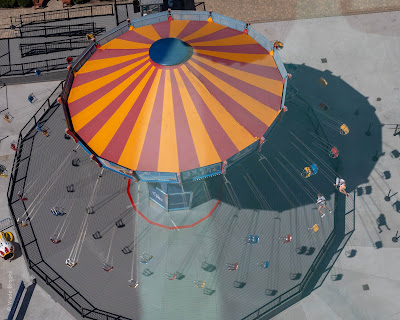
I then played around with cropping the image to remove unwanted distractions (image #2). I tend to do this when creating the image, but since I was on the Ferris wheel, I didn't have time to frame each scene. I actually shot wide on purpose, so I'd have room to crop.


Next, I took the image over to Topaz Studio, as I thought it might look good if it was a little more abstract. I applied the paint by number filter (at about 60%) and masked the riders so they would look like people.
Once back in Lightroom, I cropped the image even more to highlight just the riders.

I really like how this turned out and I may have to print it out and hang it up!
😊
Cheers,
Wade


Comments

Popular posts from this blog

Highlight Story For My Firm's Intranet Site

311 Gallery Showing in Raleigh NC   Some questions and answers for an upcoming story about my work and current gallery show. 1. How long have you been a photographer & artist, and what made you get started with this?  I started getting into photography in 2006 when I purchased a Canon digital DSLR to document my children's sports activities. I learned a lot taking images of those activities. I think the artistic side of photography came later, around 2010, when I started participating in a photography scavenger hunt. I've also always loved to draw and in college I did some oil painting. 2. Can you talk about the image that will be displayed in the gallery and what the inspiration behind it?  As a kid, I loved toy cars and Lego, so I was drawn back to these toys when thinking about scenes to photograph. I have a photography project called TheToyCarProject where I have over 300 images of toy cars, which I try to photograph as if they are real full size cars. This gallery

Gallery Show Prints

So I wasn't sure if I would like a metal print or a paper print, so I printed both for the gallery show. I decided to use the metal print as it was much more vivid. Of course, now I have a 20x20 framed print of the Mod Rod which I'll have for sale. And I'll have the metal print in the show at the 311 Gallery coming up next month. I'll be adding both the print and metal options to my new Etsy shop, plus you can always contact me for limited edition prints. The 311 Gallery show starts this Friday and runs through December in Raleigh, NC. https://www.311artgallery.com/ I also have the image available on my art site (Square format): https://wade-brooks.pixels.com/featured/1-mod-rod-wade-brooks.html and here (Rectangular format): https://wade-brooks.pixels.com/featured/mod-rod-wade-brooks.html Cheers, Wade http://www.ArtByWade.com

Poetry and the Midjourney AI

I have been testing out the Midjourney AI for a while now and have loved exploring what it can create from a simple prompt. You can see my creations and prompts on Instagram at @artbywadeai . Recently, I tried feeding the AI two of my poems and was very impressed with the results.  The first poem I gave the AI was my Sunshine Reaching one. Go take a look and then check out these great images. The prompt I used for the Midjourney AI was the text of the poem with the parameters --chaos 25 --ar 3:2 appended at the end as shown below: With rays of warmth, he embraces her soul. Arms, iron strong, surround their love. Sunshine reaching, fills the room. With feathered whispers, they embrace the day. --chaos 25 --ar 3:2 Here are the first images returned. From these, I choose the second and last to render as full size images or upscale. Here are those results. After this experiment, I gave the AI my Strength  poem and was very pleased with those results. Here is the full prompt for Strength: